Preamble
When it comes to part design for physical things, one of the best options is a version of CAD software. Computer Assisted Design is an old and well trusted practice. Once the domain only of engineers and specialists, the power of modern computers, and the skill of the people making the software means that CAD is an option available to the general public. One which is frequently used in the DIY space to put together designs for whatever people are wanting to build. From general designs to help visualise a problem, to specific detailed parts which can be exported for 3D printing, CAD is something one should be at least passingly familiar with.
Unfortunately, as with all design software, there is going to be a learning curve. One which is not assisted by the general bit-rot of information on the internet. What I mean by this, is that tutorials are not always updated to match the latest version of software. Particularly if the software you are choosing to use is open source or community managed. There will be tutorials, they will even be good. Unfortunately they may assume a base knowledge slightly higher than the user has achieved. Or the names, icons, and positions of certain options may have shifted. In all of these cases it is simply a fact that the UX developers have managed to improve something without the tutorial being updated. Not always so bad, but it can take the learning curve up a few notches.
So, let us look at some of my experience with FreeCAD. This is a well maintained piece of software, with a very detailed wiki. For the most part, the issues in usage have been due to my wanting to move fast and not really read all the tutorials or instructions I should. I have been spoilt by super intuitive design in other systems. If I had taken the time to go through the more detailed tutorial options I may have found that the small tasks I wanted to achieve were, in fact, quite trivial. Instead, I grabbed a tutorial that looked more or less like what I wanted to do, and decided that was going to be the one thing I used. It was not the first tutorial in the list, and it was written in such a way that assumes the user has a basic understanding of the interface of the software. So, the first mistake I made was not understanding the different types of workbench available. There is a subtle difference between the Part workbench and the Part Design workbench. Not one which was obvious to me at first. I was already pretty proud of myself for finding the right drop down list to pick from. The fact that I may have picked the wrong option didn’t occur to me until I had fought with things not working the way I expected for a while.
Yes, designing larger objects which are made up of multiple parts, e.g. furniture, is best done in the Part workbench. Trying to follow the same steps is surprisingly possible in the Part Design workbench. Which is the problem. You can get several steps into the tutorial quite easily before you even realise you’re in the wrong place. So I spent a frustrating several hours trying to use the wrong tool for the job. Like trying to use a screwdriver to set a long nail. Much better to use the hammer on the nail, even though technically the screwdriver is the more advanced tool.
The goal
Preamble out of the way, what am I trying to actually design in CAD now? I have decided it is time to move on from the basic furniture designs, and look at the design for a new project I am tackling. Wise or not, I am going to be designing and building my own laser engraver. I feel like using FreeCAD for this may end up being somewhat recursive as it has support for g-code generation built in. And so there is in theory a world in which laser cut parts are used in the creation of the body for the engraver/cutter. The first version is likely to use 3D printed parts rather than laser cut or hand cut parts. So, I begin by putting together my ideas. What parts am I going to need? Which workbenches should I be planning on using? Can I flip between them as I need to? I think the answer to that last question is yes. I certainly hope so.
I don’t really know what I want this thing to look like. Part of what I am doing in the design is to try and figure out what will be reasonable. That is where the 3D design software is great. I am able to iterate on the design to figure out where things will cross over one another in unrealistic ways without having to drive myself mad with straws and sticky stuff.
The process
Step one. The obvious. Create a new project. Give it a sensible name. Now I have something to come back to later. Ensure that the units of the project are set to something I can actually understand (standard metric units) which are not quite the SI units as it uses mm rather than m, but that makes more sense at the scale we’re working here. It is actually even standard in the furniture making space to use mm, so it is a scale I don’t mind going up into the thousands.
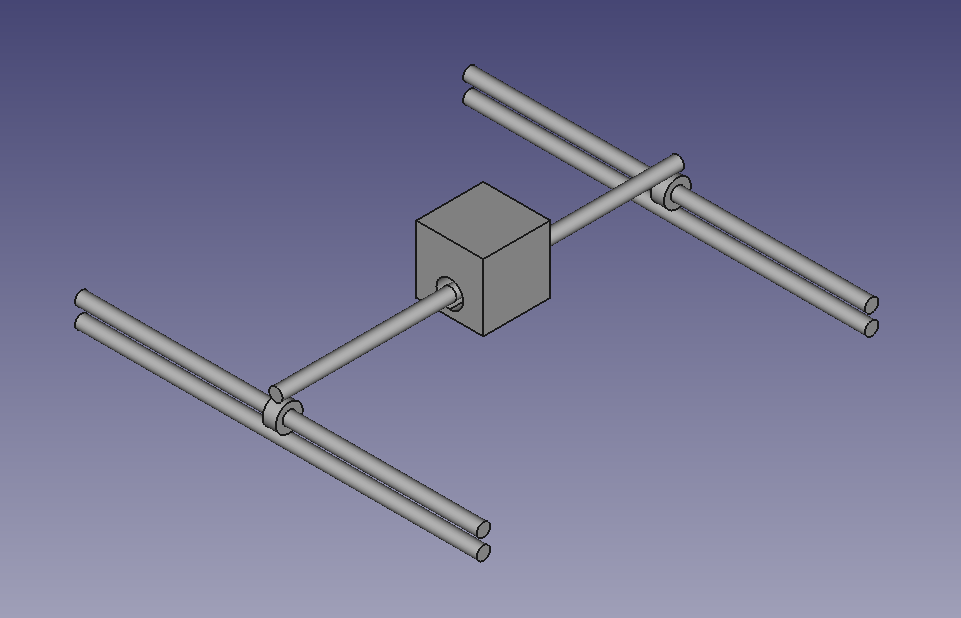
From here, it becomes some trial and error. I begin with what I already know. I am going to need rails for the laser to move along. Drawing inspiration from my 3D printers, I begin positioning long skinny cylinders in my model. This is something I can do fairly easily in the Part workbench. It doesn’t take long to have the three rails floating in space, and I need to figure out what happens next. One of the features of FreeCAD which I quite like to use when positioning my parts is the ability to use functions. Every part has a set of properties which define it’s shape and position. If you name all of your parts appropriately you can reference them in the properties of other parts. This means I can have a rail named Left-Y which happens to be the first one I created, and for which I hard code all the properties. But, after I copy-paste it to create Right-Y I can reference the properties back to Left-Y allowing me to change only one value and have the entire system shift appropriately. This is the simplest version of the programmable abilities of FreeCAD. No need to even dive into any of the python integration which is possible.
The challenge with the next steps is that I don’t fully know what I want. So I will need to put in some placeholders until I can start to refine them later. Cubes for where it is likely that I should have motors. Further cylinders for the threaded rods which will actually drive movement (if necessary). Bearings, and pulleys for the bands which do move things around. Many of these can be simple blocks until I have a better understanding of how all of them work together.
As a great example of figuring it out on the go, let us look at my approach to creating a simple ring to act as a bearing. The details there-of to be finalised later, it must simply slide along the rail already in the design. My first approach is to look at the easy to add parts, and think “ooh, torus, that looks good”. So, put a torus on the workbench, and begin adjusting the properties. The issue, is that a torus is a thing with rounded edges. Doughnut shaped, rather than being a cylinder with a hole in it. It is possible to make something which looks almost cylindrical from some angles, but it turns out it is not the right thing. Now I could fight with it for ages, or I could have a second look at what is available. There is something called a Tube. It is precisely a cylinder with a hole through the middle. Far fewer options to consider, inner radius, outer radius, and height. Then get the angles and placement right, and sorted. I’m sure if I actually knew what I was doing, or had the patience for a tutorial of some kind I would have chosen the right part the first time. But where is the fun in that?
The outcome
Not that the process is complete, but it has been started. There is no doubt that designing a fairly complex system like this is going to take more than a couple of hours, but it really isn’t all that impossible to get the concepts going. With no special hardware, no real prior knowledge, and enough patience, one really can learn almost anything. This isn’t the end of the story – it is only just the beginning. I will be working on more complex parts to hold everything together, and will be looking at different options once I start trying to put the thing together IRL.
I wouldn’t call anything you see here a tutorial. If you want one of those I really do recommend the official wiki where you can learn anything from modelling a house to a small part you need for a project. I am likely to go through one or more of them still, but for now I have a concept which looks more like a space station or other manner of vehicle, and that is sufficient for me.